
| For Ray-Lin Index, click HERE ***** To return to the BCOIE Chapter website click HERE or on our logo above. |
|
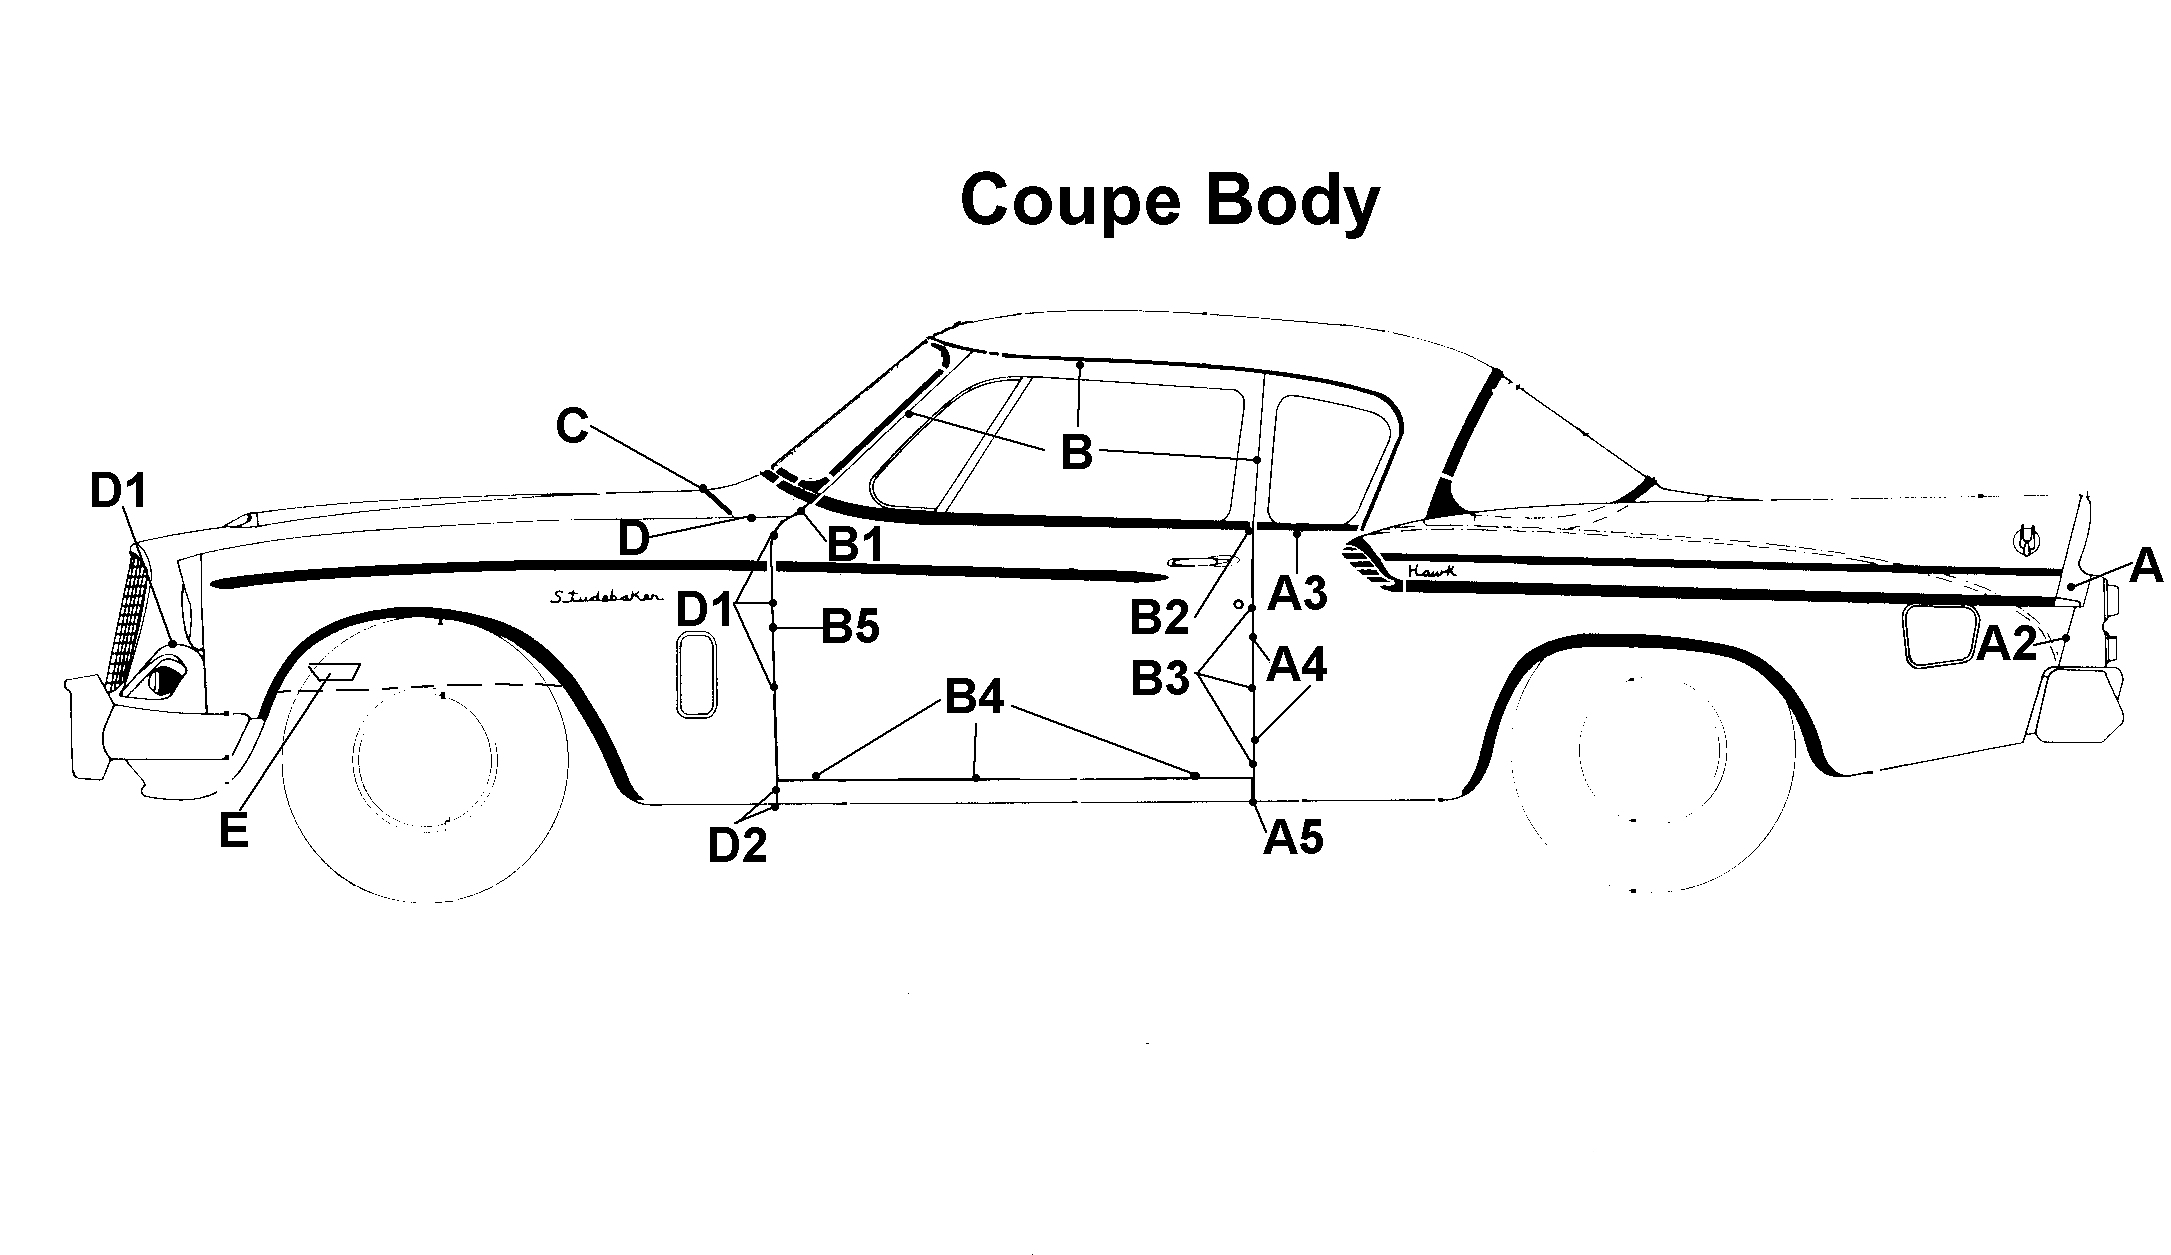
Studebaker Body Assembly and Alignment This page is being created to hopefully answer a few questions about aligning various body panels on most Studebakers. The same procedures work well for cars and trucks. Save and print one of these images: Coupe body Hardtop Body
I have broken down the assembly procedure to go by letters and numbers. I hope this makes it easier for any Studebaker enthusiast to follow. Whenever I am restoring a car, this is the procedure I use. I find it the easiest, and I get better results with alignment. Studebakers were not that well constructed from a body alignment standpoint, so you will have to "fudge" a few things and do the best you can. Obviously, if you only do individual panels, you will have to take the alignment cues from the adjoining panels. A "good" alignment gap should be around 3/8"- any smaller, and you may have clearance problems, and wider gaps look funny. The key to it looking good is to try to keep the gap even around the panel. A: Rear Fenders/quarter panels: A: The alignment of the rear fenders is probably the most important. All the other panels will get their positions dictated by these. On most later Studebakers, the quarters are automatically aligned on the top, so your concern will be the fore-aft positioning. Begin at point A and align the quarter up with the rear panel. A2: Install the tail light housing assembly to get the rear part of the quarter to match the housing. When it is aligned, bolt the rear of the quarter solidly. A3: At this position, the concern is the alignment with the body shell along the edge under the rear quarter window-as well as the front edge of the door opening. Adjust as necessary here-and bolt solidly. Start with the TOP bolt inside the door jamb (lock pillar), and then the bolts below the quarter window (inside the car). Then you can work your way rearward along the quarter panel top bolts. A4: Now you can tighten the remaining Lock Pillar bolts- make sure you use seam sealer here. If the door is on- be sure the quarter follows the curvature of the door. If the door has been removed, it may be a good idea to temporarily re-install it- to be sure the front of the quarter panel aligns properly. A5: If the rockers are still here, align the bottom of the quarter to them. If not, have someone hold a rocker in position so you can achieve a good gap/alignment here. After quarter installation, related assemblies like fins, trunklid, ... etc, can be installed. B: Doors: B: Probably the most important alignment on the door is the gaps at the window opening. This gap needs to be correct for proper weather seal contact. It is a good idea to install the weather strip before mounting the doors. Attach the door to the hinges/hinge pillar and snug the bolts up so the door will not move without a little effort. It's a good idea to install the lock assembly and striker plate to aid in holding the door in position. With someone inside the car with a prybar or large screwdriver (wrap end in duct-tape). position door in the opening to achieve an even gap around the opening. Pay close attention to the alignment at points B1, B2, and B4. You may need to temporarily install the rocker to make sure you can achieve a nice level seam at the door bottom. B1: Once the door is centered in the opening, the person inside the car can use the prybars to raise/lower the door to fit the cowl/fender here. B2: Here, you will need to try to keep the door even with the top of the quarter, or the body shell. If the door is without glass, regulators or most door pieces, it's a good idea to set this a little high- perhaps 1/4" to 3/8". The lock pillar and striker plate will help hold it up. Once the inner door pieces and glass are installed, the door will likely "sag" into position. B3: This gap is very important- It is probably the most visibly noticed alignment. Try to keep it as even as possible. B4: If the rocker was not removed, you don't have much choice here. Remember that you may have left the door "high" in the back to allow for some "sag" later. Try to achieve the best gap you can without sacrificing weather seal function, or alignment at points B1 and B2. If the rockers are NOT on the car, make SURE you can install them properly- sometimes, you will need to bend the sill upwards to get a better fit. A floor jack and long 2 x 4 works well. I have found that a "tighter" gap at this position(1/4" or so) looks much better, and the weather seal is better- it also allows more clearance for the door drain holes. C: Cowl and Hood: C: It is VERY IMPORTANT to mount the hood BEFORE installing the front fenders if possible. It is much easier to achieve a good, even, gap at the rear of the hood- and center it along the cowl. It also aids in the height and hood-center clearance issues. Be sure to install (if only temporary) the cowl opening weather strip before installation. It will often aid in center-clearance problems. D: Front Fenders: The fender must align with several panels at the same time so it is a difficult installation. The factory mounted the fenders, front grille panel, lower air scoop, and other integral parts as a unit. I like to do this also.
D: After you have bolted the front sheet metal together, make sure the bolts are "snug" but that you can "adjust" the alignment with a bit of force (heel of your hand, or a rubber mallet). Position the assembly to begin alignment at point D (top of the cowl- front top of door at hinge pillar). Install the hinge pillar flange bolts "loosely"- only enough to keep the assembly from falling off- but loose enough to be able to install shims as needed. Remember to install the rubber pads-whether they were there originally or not. Lift or lower the fender to align the top with the cowl, and top front of the door. Use shims behind the front fender-to-hinge pillar brace to achieve a nice gap- remember- the alignment of the front of the hood is related to this gap also- be sure to check it often! Snug the upper bolt so the fender will not move.
D1& E: Move the fender in, out, up, or down....to align any body lines and the shape of the door. Adding or removing shims at point E (inner fender pad) will widen or reduce the gap at the front of the door. Tighten the center bolt- make sure you have adequate clearance for the door to open. Move to the lower bolt on the hinge pillar brace and adjust/tighten as necessary for proper gap at the rocker panel and lower door. E: This area is where the inner fender assembly has a "pad" formed of several layers of sheet metal. Shims are utilized here to raise/lower the front of the fenders- this affects the door gap, and also the hood gaps on either side. You can even the side- hood gaps by moving the whole front end assembly left and right. Your adjustments in this area are used to fit the hood correctly. Once you have a good fit, you can tighten all the front assembly bolts securely
|

|
www.StudebakerSoCal.com |