|
Finishing Your New Paint Job
Contrary to popular belief, An expensive
paint booth, proper surface preparation, and good equipment and spray
tequnique do not always guarantee a "perfect" paint job. In fact, it is
virtually impossible to produce one even under the most ideal
conditions. We, as collectors that like to do a lot of the work
ourselves, often are disappointed with the results of our Paint
attempts. I wrote this page to help answer the questions of an
individual that was painting his own pride and joy. I will address the
process of painting the car on another page, but for now, we will only
be concerned with one that has already been painted.
Tools/materials needed:
A: 1200-1500 and 2000 grit wetsanding paper
B: a black foam "wetsanding" pad- about 3" x 6"- ask
your paint supplier
C: a watersanding "squeegee"-
ask your supplier
D: Buffing Pads: I prefer the 3M
"Perfect-It" Polishing system
- 3M #5718 buffer backing pad-provided
it fits your buffer- this is a "Velcro-type" pad, and makes switching
between pads very convenient.
- 3M #5723 Foam compounding pad (2 each
will do a car)
- 3M #5725 Polishing Pad (2 each will do a car)
NOTE:-I prefer the foam pads rather than lambswool, as they do not trap
pieces of grit and trash in the nap of the pad and thus drag it across
the surface of the paint putting DEEP scratches in the surface.
- 3M
#5954 or 5955 Rough Compound- (2 quarts for a car)
- 3M #5995
Polishing compound (2-quarts for a car)
- LOTS of soft terry towels!
How To:
1: Cover the parts of the
car you don't want to get compound all over with thin plastic film.
Using good quality (3M) masking tape, tape all edges and high spots you
don't want to buff/sand through.
2: Watersand the orangepeel until
"flat" with NO COARSER than 1200 grit sandpaper. Use PLENTY of running
water- it will help carry away the trash particles as you sand. If you
have pieces of trash- or fisheyes, you can do them in spots with 1000
then 1200 after. If they are near an edge or body line- leave them- you
can go back later after you get a little experience with the buffer and
the rate at which your compound/polish is cutting, and reduce the
chance of buffing through. Use your squeegee to check your sanding
progress- you will see what I mean when you do it. Try not to watersand
where the buffing pads cannot reach- it is very difficult to hand
compound this paint!
3: PUT ON AN OLD CRAPPY APRON- I have a
denim one that has a big pocket in it for the compound bottle, it took
my wife about 20 minutes on the sewing machine to make it.-
then,With the tape still in place, use a VARIABLE speed buffer, the
coarse buffing pad, the rough compound, to begin buffing away your 1200
scratches. use liberal amounts of compound until you are close to a
good shine- you cannot make it "scratch-free" with the rough compound,
so do not worry about swirl marks! Start the speed pretty slow so you
don't sling compound everywhere- and speed up as the compound works
it's magic- the compound will break down into finer particles as it
works till it reaches a point when it's no longer cutting...add more
fresh compound.
4: Do ALL your rough compounding first...don't get
anxious to see what it will look like when done! (well, maybe a little
spot)..................
5: remove the tape and the tape glue
residue(enamel reducer or pre-cleano)
6: CAREFULLY compound away
the line where the tape was. You are now working near edges and it is
very easy to break through! always buff AWAY from an edge and into thin
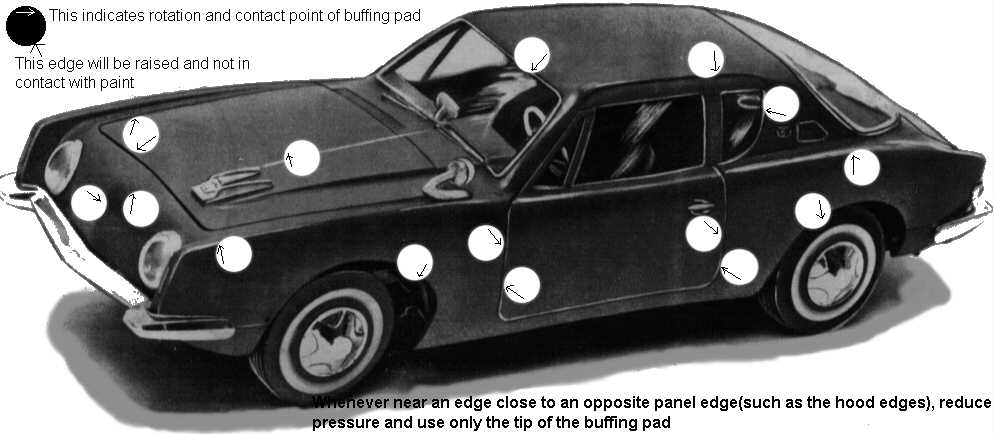
air! Where this is impossible, be very careful!
See Avanti Image
Below!!!!!!!
7: Switch the buffing pad to the Polishing Pad.
8:
I like to spread the polishing compound on with a small sponge -sort of
like really heavy wet waxing!
9: Using the tip and outer 2" of the
polishing pad, do your edges and hard to reach spots, you can then use
more of the pad to do the wider-flatter areas. Buff to a high gloss.
10: Wash all spare compound etc off and dry car...rework areas you
are not happy with...then HAND polish with the fine compound- using
a tight foam pad similar to the polishing pad- to remove any remaining
swirl marks.
TAA DAA.. Put on Sunglasses or you'll burn
your eyes from the shine!
|