|
Body Shop 101
The first page will concern itself only with some
preliminary instruction on typical body-shop tools and their uses. If
you plan on rebuilding/restoring the body and sheet metal on 1 or 2 of
your own cars, then these are the tools you may need to acquire or
borrow.... Most if not all of the tools shown will save you well over
their value in time savings alone. Plus, the quality of the finished
product will depend largely on having the right tool available to do a
certain job.
Part 1: Tools
1.
Air compressor:
5 hp or 11cfm minimum- Yes, you can work with less, but
efficiency suffers greatly. Some air tools (die grinders, air sanders,
sandblasters) use a considerable amount of air, and a 1HP compressor
just won't cut it.
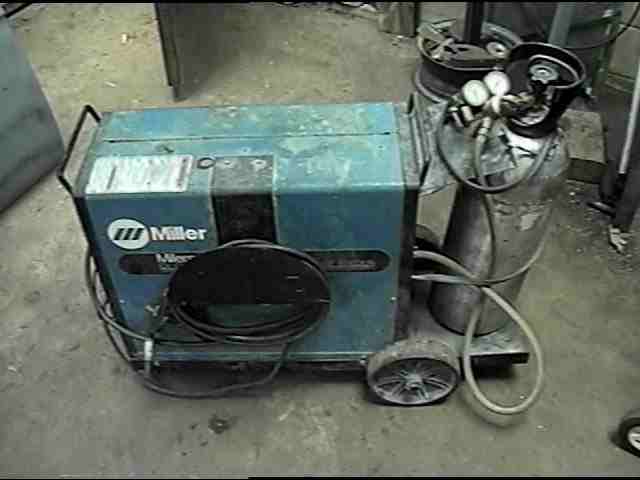
2.
Mig Welder:
The days of riveting patch panels in a car are gone. The results just
didn't last, and strength was compromised. This tool provides better
and much faster results. I have used both the small 110v models Daytona
Pocket-Mug- $200), and very large mug welders (an old Miller 35- $600
used). Both were adequate for the job, but each had a narrow curve for
good results. I now have the use of this Miller 135(approx $950
w/bottle). Believe me, a "GOOD" welder will save you a lot of time, and
will retain a lot of it's value if you look to resell after you are
done with it.
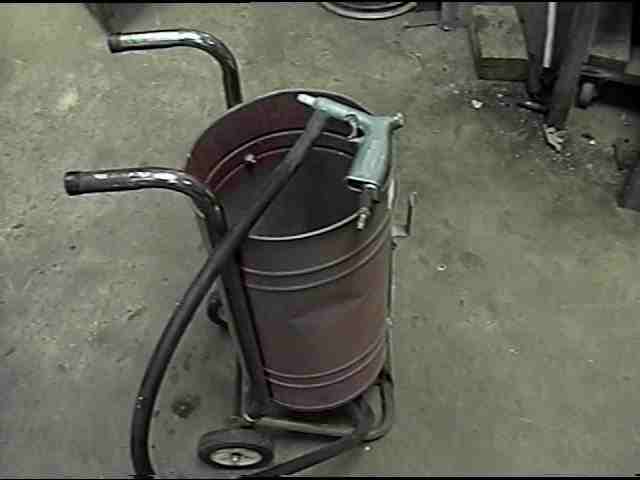
3.
Sandblaster:
For repairing rust damage, you can't live without one of these. Either
a cheap Siphon-feed, or a bit more expensive pressure-pot. Both types
work great for preparing a surface for welding, or after welding- to
prep the welds for primer. They also work well for stripping small
parts... I have even built a small "cabinet" from a cardboard box and a
piece of glass... They use a considerable amount of air, so you will
need a higher volume compressor.
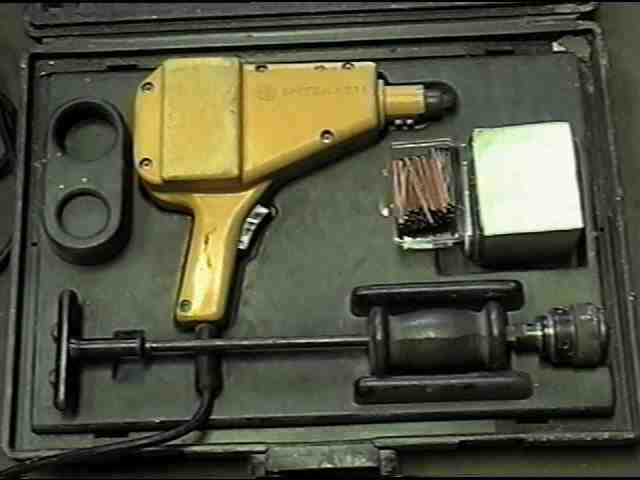
4.
Spitznagle or "Stud Welder":
This is definitely a tool you need only borrow or rent. You may even
find a body shop willing to pull any dents you need with theirs. If you
have a few door dings, small dents (less than 6" or 1" deep) or a long
crease in a panel, this tool is invaluable for pulling them out. It
used to be- that one would drill a series of 1/8" holes and use a "dent
puller" with a screw attachment on it. With this new design, a metal
stud is welded to the panel wherever needed, and a special puller is
used on the stud. The combination of the heat, and the puller, make
easy work of small dents.
5.
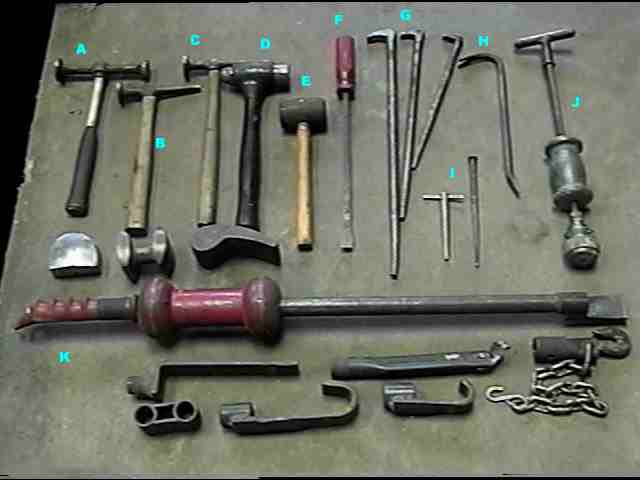
Hand Tools:
-
(A)-
Flat
Tapping hammer- for
flattening out shallow dents in sheet metal- used with a flat
"dolly" as a backing.
-
(B)-
Shrinking Hammer with Chisel end-
The "shrinking" end of the hammer will have either a swirl pattern
or a raised checkerboard pattern on it- these are used to shrink
metal that has been "stretched" to the point it will not return to
it's original shape as you hammer it against a dolly. The chisel
end, is used to remove (or create) creases in sheet metal. This is
a "Must Have" hammer.
-
(C)- Pick Hammer-
One end of this hammer is a dull point. This hammer works well for
shrinking the area around large dents that stretched the metal. The
pick points will allow the stretched metal areas to move into as
you use your other hammers.
-
(D)- Dead Blow Hammer-
This is a heavy hammer that is designed to transfer more of the
strike-energy to whatever you are hitting. There is very little
"rebound" from a hammer of this type. This hammer works well on
heavier sheet metal, and on the more "structural" pieces of the
body- ie: body mounts, frame brackets..etc.
-
(E)- Rubber Mallet-
For popping out minor dents that have not stretched the metal
enough to require the use of the other hammers.
-
(No Letter) Below
Hammers - Here are 3
"Dollys". They are heavy cast metal, and are used behind any sheet
metal you are using a hammer on. They help return the metal to it's
original shape. They come in various sizes and shape. Shown
are: A "Heel" dolly
(probably the most used), A "Double-Block", and a
"Comma" dolly.
-
(F)- Handled Prybar-
used for prying (thus the name <g>).
-
(G)-
"Lady Feet"-
These can be used for prying and otherwise manipulating
metal- and as "drifts".
-
(H)- Crowbar-
Both small and large ones have a number of uses for working on a
car body- from aligning doors to installing body mounts. Most folks
how/when to use one.
-
(I)-
Drifts- A drift is used
to align holes, or straighten a hole that has been damaged. They
can also be used to line up bolt holes for easier installation.
Everyone should have at least
2
of these tapered drifts in different
sizes.
-
(J)- Dent Puller-
Most of the cheaper ones use a screw to pull out a dent- I no
longer use that style. If you do drill holes in order to pull out a
dent, I recommend you weld the hole shut when finished.
-
(K)-
Slide Hammer and attachments- A much larger type
of dent puller. These are used for major crash damage, and for
pulling the more structural areas that may be damaged- ie: door
posts, hinge pillars, bumper brackets, etc. The variety of
attachments allow for very flexible use.
6.
Some other Tools:
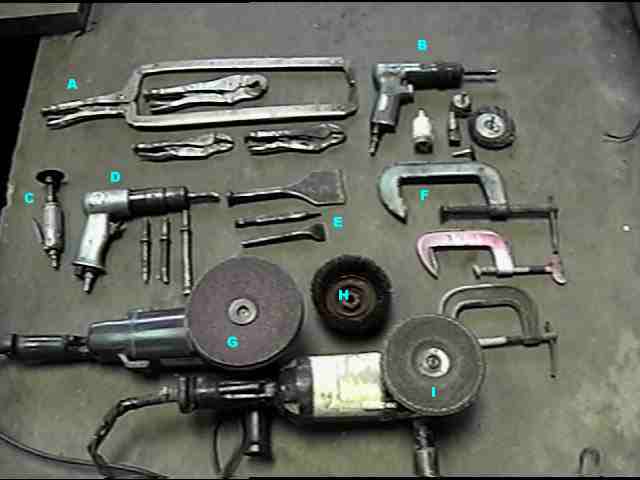
-
(A)-
Vice Grips-
These come in a variety of sizes and Jaw designs. It is a big help
to have a lot of these. The large pair with the deep jaws is very
versatile for metal work.
-
(B) -Air
(or electric) Drill and attachments-
Unfortunately, a 'good" quality air drill is expensive. I wore out
the cheaper varieties far too quickly, and they just didn't have
the required power. A good assortment of
drill bits
is a must! 1/8" double-sided bits are
fairly common for rivet use. A good selection of stainless steel
wire brushes of various sizes are a big help.
-
(C)-
Die Grinder-
A must have tool for anyone thinking of doing bodywork. It is
better to have a second high speed cut-off tool with the built-in
guard for most of your cutting uses. .
-
(D)- Air Chisel and
bits- In my years in this business, I seldom use an air
chisel. I use it more for mechanical work than body work. It will
be a help for those in the rust belt for bolt removal, but is far
too unforgiving to use on the body.
-
(E)- Hand Chisels-
These provide much more "control" (so long as you can control your
hammer- and keep your fingers out of the way). when it comes to
cutting and forming sheet metal
-
(F)- "C" Clamps-
Good for holding your work still, or clamping pieces
together for welding, grinding ..etc. I will often clamp a fender
or door to my worktables to prevent them from moving around while I
work on them
-
(G)- Electric or Air
powered Side Grinder- I have 2 large electric grinders, a
4 1/2" electric grinder, and an air powered one. One is variable
speed, and one is high speed- I use the air grinder mostly for
buffing. If I were to recommend only one, It would have to be the
variable speed. A good variety of disks, stones and wire wheels
will help you with a variety of jobs. I have a small air grinder,
and a die grinder, so I don't "need" a small side grinder. For
those of you without an air compressor, a small Makita/Dewalt
grinder with a 4" wheel and other attachments is a very versatile
tool.
-
(G-H-I)- Sanding disk
w/flexible backing pad- Wire Cup-Grinding Stones: These
various attachments for your side grinder will allow many different
uses. Sanding disks in various grits from 36- 100 are used for
stripping paint and removing surface rust. Do not try to use them
to remove fresh welds, or scaly rust. They will wear out too fast,
the flexible pad doesn't allow you to control the grind rate, and
they create A LOT of heat. The wire wheels in various shapes and
sizes (and materials: SS, Steel, Brass) are great for cleaning
welds after grinding, removing rust scale, and brightening metal
you need to weld. Grinding stones are what you want to use on
welds. their stiffness will allow you to grind the weld down flush
with the surface of the metal without leaving a ridge, or grinding
the metal on either side of the weld. They also concentrate the
heat more than a disk...so take it slow!
|