|
Studebaker Air
Conditioning, Part II
Adding AC to your V-8 equipped
Stude
Many have asked...
"What is the best way to add AC to a Studebaker V8?"
(specifically- non-factory units, Compressor upgrades, or R134
Conversions)
Obviously, the "best" way would be to find a 100% complete AC unit
from a factory equipped Studebaker. Various pieces are relatively easy
to find, but so many cars have had pieces scavenged, or the guy parting
it out- didn't bother to get "all" of the necessary pieces.
My
"first" technical page about AC for your Studebaker is located
HERE:
It shows different ways to locate the AC compressor, how to run the
pulleys and belts, and includes a parts list of what you may need to
find for your installation. However, After installing AC on
several Studebakers, I believe the way pictuted below is the "best"
I've found yet.
I like this set-up for several reasons:
1) You do NOT need to find a Factory compressor bracket,
idler pulley, water pump pulley(very hard to find) or the matching
crankshaft pulley.
2) Most of the bracket fabrication can
be done with the minimum of tools (or experience): just a Drill, Big
Hammer, Vice, some sort of cutter capable of doing 3/8"(minimum) thick
steel (die grinder w/cutoff wheel, hacksaw), and a small
(rented/borrowed) welder.
3) The use of a new Sanden
compressor: Easy to fabricate mount, (relatively) cheap, less
vibration, readily available, efficient, can be used for R12 and R134
systems.
4) No need to add pulleys to the crankshaft
(requires pulling harmonic balancer)- it uses the original generator
drive/water pump pulley.
5) I also like to incorporate an
"upgrade" to a Delco one-wire 60 amp alternator ($40 or so) into the
setup. This provides better low-speed charging especially when in
traffic with the AC running.
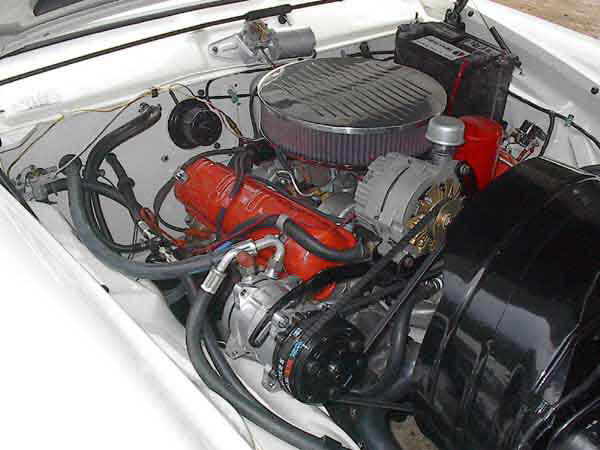
Here's a picture of this setup
recently installed on Lee Aanderuud's 1961 Hawk. It requires the bare
minimum of modification to the car... and can be returned to original
in a few hours. None of the wiring needs to be altered, but you do need
to run an "additional" wire for the Alternator swap. Notice that the
alternator is driven by the AC compressor clutch's 2nd (outer) pulley.
Some have suggested that this is "bad" if the compressor goes south...
you would lose your Charging system as well... My answer to that is: in
30 years of driving AC equipped cars.. I have never had a compressor
clutch lock up. I have had the compressor itself lock, but the clutch
just freewheels when it goes bad. This setup is no more likely to cause
problems- than if your original generator should have trouble.
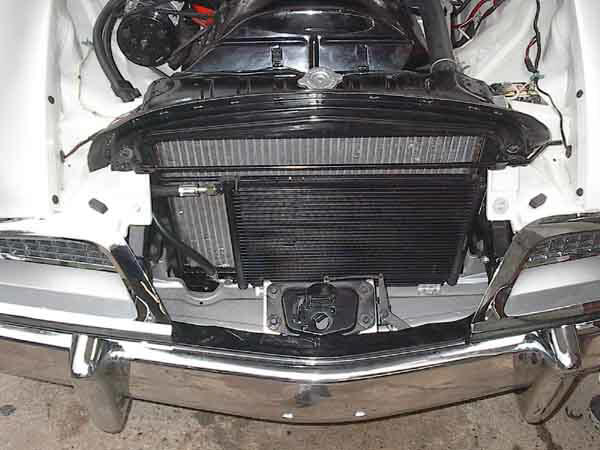
The compressor mounting bracket
can easily be fabricated from an Original Studebaker Generator bracket.
What needs to be
done:
-
The first thing to do is drill out the original
generator mounting holes to 5/16".
-
I like to use threaded rod
(A) to go all the way through the bracket, but you can just
as easily use the correct length bolts instead. I just believe the
threaded rod will keep the mount more "square". It is a bit harder
to "install" this way since you have to thread the 2 inner nuts,
washers, and lockwashers on a long way.
-
A thick washer (B)
will need to be added to the front mount- to shim the compressor
about 1/8" further forward. This will align the AC compressor's
(rear) pulley with the original generator and water pump pulleys. I
like to tack-weld this washer in place- but it is not necessary.
-
After you have aligned the pulleys- and snugged the
front mounting nuts, measure the distance between the
compressor's rear mounting lug, and the rear lug on the generator
bracket. You will need to find some bushing material
(C) (I use a piece of steel pipe)..
and cut it to fit snugly between the 2 lugs. I cut mine a bit long,
and use a grinder to trim it until it fits nicely.
-
Mount the compressor, and "bend" the original
generator adjusting arm- to fit the AC compressor's upper mounting
lug.
This completes the "fabrication" needed to mount a
Sanden SD- series AC Compressor.
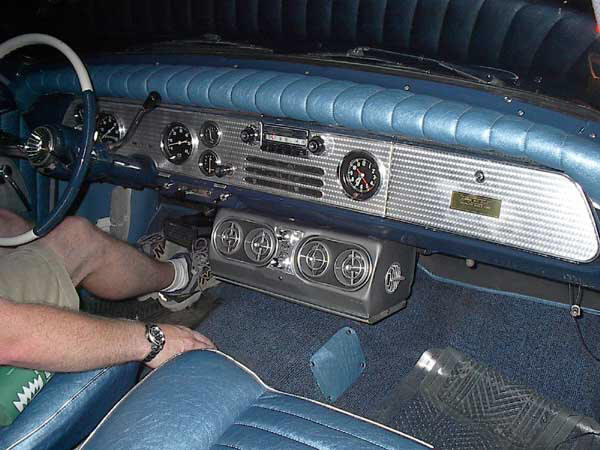
Condensor:
The AC condensor is the part
mounted in front of the radiator. For Hawks and other C/K bodied
cars, I use a 14 x 20 inch universal- type condensor. This size seems
capable of handling the cooling needs of most Studebaker AC set-ups.
I have fitted this same condensor to Lark-type Studebakers also. It
takes a bit more fabrication to mount it securely due to the limited
space- especially on pre-'63 Larks.
As seen in the photo, It is
mounted to the lower air scoop by using 2 pieces of 1" x 1" aluminum
angle. I like to use aluminum because it won't rust but you could use
almost anything, as long as it will hold the bottom of the
condensor stable. If you look closely, you will see that the top
of the condensor is held to the radiator brace with 2 Nylon tie-wraps.
There is a small piece of foam insulation behind each corner where the
condensor would touch the brace. This is to prevent rubbing or
rattleing that may damage the condensor. The top is the "hottest"
part of the radiator, it is the first to receive engine coolant.
For this reason, I like to mount the condensor as low as possible and
leave a few inches of the radiator exposed to fresh air of it's own.
Does it help cool the radiator? I have no idea, but I don't see
why it wouldn't help.
Evaporator:
I prefer to use an original
Studebaker inside unit. They usually mount pretty easily and look more
like they "belong" in there. I have not had any trouble with
flushing out original units in preparation for R12 or R134 use.
Replacement blower motors are available and you can find switches and
controls that easily adapt if not a directly bolt-in.
There are also many NEW under-dash or hang-on units
that can be installed and work well. Most Studebakers have
limited space under the dash, so good-looking hang-on units are my
preference.
|